Friday, December 30, 2022

Funeral Memorabilia Using Clear Sticker Paper and Candles

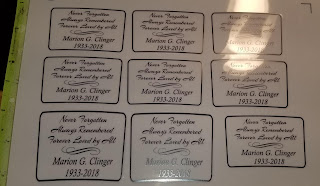
Easy funeral memorabilia using clear sticker paper 

I created these for my grandfathers funeral to give to my aunts and uncle and anyone else who wanted to take one to remember him. I printed them on clear sticker paper, using my silhouette cameo to design and then cut out the printed design. I used the print and cut option so I didn't have to cut out each one individually.  After the labels were printed and cut they were attached to small candles that I purchased at the dollar store.  

What a great way to remember a loved one. 


Print and cut option


If you look closely at the photo you can see that they weren't perfect but they still were success.

If anyone has any questions on how to do this feel free to contact me.
Thanks for checking out this post. 

Monday, July 4, 2022

Distressed Coffee Table

Before and after pictures of a distressed coffee table I did for my daughter. This was done using paint to achieve the distress look without sanding.


Starting off I only lightly sanding the legs and bottom of the table, I just don't have the patience to sand all the nooks and crannies. Basically just need sand enough so the paint has something to adhere to since this had a finish on it. The top I completely sanded down to the bare wood, Except for the grooves but did take a piece of sandpaper and got in the groove to lightly sand that area.

Then painted with plaster colored chalk paint 2 coats all the areas including the grooves on the top but did not paint the bare wood with the chalk paint. My daughter loves stars so I added a star at each end of the coffee table with black acrylic paint.


The next step I took some black acrylic paint and dry brushed here and there on the legs and base of the table. I did this process in the areas like I would have done if I would have sanded it. Some areas I thought had to much black so I just took the plaster chalk paint and lightly went over the black.


Next took some dark grey paint and painted the rim around the top to give it just a bit of an accent so the legs and top did not blend together. I then used a weathered stain and stained the top.

Final step was to add a clear wax to the top to give it some protection.

I hope I helped someone at getting a distressed look with out sanding. 

Monday, July 23, 2018

DYI Simple Elegant Green and White Nature Themed Wedding Decor Ideas

Wedding Decorating Ideas

DYI Simple Elegant Green and White Nature Themed Wedding Decor Ideas we used at
The Nature Inn at Bald Eagle state park which is one of the most best places to get married, so I wanted to share with everyone pictures from my daughters weekend that was held this past weekend. 
I am so happy for my daughter who is one of the most beautiful brides I have ever seen. Yes I may be a little biased because she is my daughter, but her happiness just shined throughout the whole day making her even more stunning.

I'm not going to write a lot for this post just wanted to share some of the pictures from my daughters wedding and some of  green and white nature themed wedding decor for her big day. 
Look at how stunning she looks. Her gorgeous curls in her long hair. White strapless multi layer flowing wedding dress.
Continue on to see the rest of the wedding photos of the decor and the set up that was made for my daughters special day.

Thursday, December 29, 2016

Cut to Edge (Tutorial) in Silhouette Studio

As I was checking my default settings after reading a post from Melissa at Silhouette School Blog on 10 Silhouette Studio defaults you can and should change, (I must say she is my go to for wanting or needing to know something about my Silhouette Cameo machine.)Ok so when I was checking my settings I noticed a setting that said cut to edge.
And knowing how I am (always gotta something) I thought I'm gonna see how this works, so I changed setting doing test and here I will show you how to cut to edge. Its saves a little bit of vinyl. It might not be much but I'm frugal with my vinyl so I will keep my cut to edge default checked.

Saturday, October 15, 2016

OLD MILK CAN PORCH DECOR


This was an easy project using an old milk can.
All you need is
 an old milk can
burlap
raffia
gingham or any other country material you like
some pip berries
rusty star
hot glue gun and glue sticks

First measure around your milk can so you know how much burlap and material you will need to cut the length. Then measure how much you want to cover of the can for your width. I cut the material smaller than the burlap leaving about inch and half space on top and bottom to allow for my burlap to show. But you could cut any way you prefer, this is just how I liked the burlap and material to look.

Ok now after the burlap and material are cut I then attach the burlap first by hot gluing the one end piece to what would be the back of my finished milk can. Then as I was wrapping the burlap I also hot glued here and there so it would stay in place finishing up at the back of the can meeting my starting pieces. Do the same then with the material.
Take raffia wrap around the neck part of the milk can. I wrapped several times til I like the way it looked. I just tied it off but you could make into a bow if that's what you like.
Next took the rusty star, mine had a hole in the one point, added a piece of wire and then wrapped the wire around my raffia in the center to hold star in place. 
Finally took a hand full of pip berries and wrapped their ends around the raffia to secure them in place.
And that was it for my old milk can decor that I kept on my porch. Pretty simple and easy project to do with an old milk can.

***I do recommend that you display anything with the berries in a place that does not get wet.*** 

As always happy crafting.

Friday, March 25, 2016

Spray Paint and Vinyl Stencil Signs


Lately I've been doing some projects with spray paint and stencils. This method seems to work a lot better for me.  I've tried doing the method that people call PVPP (paint, vinyl, paint, paint), but it just doesn't seem to work for me.  Seem to always getting bleeding under my vinyl and have to touch up. With using the spray paint and vinyl. Below the pictures is explained on how I made these signs using spray paint and a stencil I made using my Silhouette Cameo

 I have not had to touch up these spray paint and vinyl stencil projects at all.


First off I had to figure out what signs I wanted to make.  Then got my boards around. Sanded them good. Decided on the paint colors then painted my base color, which is the color of my wording.  Then went to my Silhoutte Cameo to cut the designs out. Next placing the stencil cut from the Cameo onto my painted board.

Then I used a can of Rustoleum Spray Paint, any paint would work but this is what I had on hand.  First a very light coat, then a second coat covering completely but still not too heavy.  Last a third coat just to make sure everything was completely covered.  Letting it be til almost completely dry, before moving on to working on removing the stencil.  **I tried a little too soon and I was getting my prints on the sides of the board.**

Final step I used a dental pick to remove the stencil poking into a corner of each letter and pulling it off the painted board.


If you look pretty close the half done picture you will see how I have no bleeding under the stencil. For now on spray paint is what I will use to make my signs, at least until I figure out how to do the PVPP method good.
So give it a try and let me know how it worked out for you using the spray paint and vinyl stencil method.

As always I've Gotta have Projects.
Happy Crafting


Saturday, January 9, 2016

1974 Ironhead Sportster turned Chopper

Husband turned his blue 1974 Harley Davidson Ironhead Sportster Motorcycle into this green beauty Chopper. All period correct parts and a lot of long hours and money but this one sure is a beauty. I even got to help with this one making his Harley Davidson stencil for him to paint on his tank. And made him a lost boy decal for his rear fender using my Silhouette Cameo. This chopper is a little easier on my behind when riding since he went from a little pad for me to sit on to a king and queen seat. The motorcycle is a hard tail which means it has no springs which is a little rougher ride.
Post not very long just wanted to share this beautiful bike.
You can check out the previous post on the Sporster build here.

THE GREEN CHOPPER BEAUTY


1974 Harley Davidson Chopper Video


Featured Post

Picture on Pallet with Tutorial

After seeing all these picture on pallet ideas going around I decided to make my first one. Love how it turned out. For those o...