Showing posts with label recycle. Show all posts

Monday, May 19, 2014

TP Make Shift Glue Gun Holder

A super easy make shift Glue gun holder from toilet paper rolls for you to make. Super easy basically free.

All you need is an empty toilet roll, scissors and of course your glue gun. Oh don't forget your glue sticks as well. 

Heat up glue gun. Take empty toilet paper cut about 2 inches from one end  set aside take the remaining bigger section cut to make it open.


Flat and smooth out trying to get it pretty flat.
 Next grab your smaller section put a ring of glue around the round straight edge. (I used the uncut end  as that was for sure straight) Now place that on the end of the flattened toilet paper roll.

I'm sure you could decorate it if you wanted to but for me I'm just leaving it as it is. With it being super easy to make and practically free I could make several a week.  Besides the holder is mainly to stop the dried hot glue from getting on my table, my main work surface.


It may not be the prettiest Glue Gun Holder but at least I will not have dripped dried hot glue on my work surface.

Tuesday, May 13, 2014

Removing Old Paint from Drawer Pulls and Hinges

Did you ever need to remove old paint from drawer pulls? Well I've have. Look no farther I've got a simple way to remove that old paint with things most of us have on hand and NO harsh chemicals. I watched this video on Youtube and looked up different ways. I ended up combining and not really following the video.
I started to follow the video on removing old paint from hinges but with a husband that decides at the last minute the method got changed up a bit. 
Instructions are quite simple. 

Supplies
an old pan (one that will NEVER be used for cooking food in again)
some baking soda or dish detergent
your hinges or drawer pulls
water
These drawer pulls along with the whole dresser were painted a lilac color. Not quite my style. 

Before


After


First method from video
Sprinkle baking soda in bottom of pan enough to cover the bottom

Add your hinges/drawer pulls. Add water to just cover the items.


Bring to a simmer (just little bubbles) put on low heat for 1/2 hour. 


Your paint will come right off just using your hands. For the crevices I used old toothbrush and a dental pick


Well with my husband up and wanting to leave just after I started this method.  I found out it also works with the drawer pulls just being in the simmered water (stove not on anymore) for about 2 hours while we were gone. So if I'm not in a big hurry I can start the method at time, hours if I want to, before I'm ready to get to work on the #drawerpulls.

They must stay in the water though or paint sticks back on. I found this out. But don't worry just put them back in the water.

Second method basically same as the first but if you don't have any baking soda just drop a few drops of dish detergent in the water instead. (Which who doesn't have that on hand?)

If you do the cooking method don't forget about them like my husband did and let them cook dry or they will be ruined like these few he forgot about. Handles are now flattened and puddle of melted now hardened metal.  Not good.


Now try removing old paint from drawer pulls and hinges. Basically from most metals. 

Sunday, August 4, 2013

Grunge Mix using Oatmeal

I came up with this Grunge mix using Oatmeal by taking a little of this and a little of that from other recipes or from other crafty people's tips to make these neat looking candles, and my country bath jar.   Cans could also be used with this grunge mix using oatmeal.


My grunge mix I used for my candle and bathroom glass jar. Sorry kinda blurry

  1. some cinnamon
  2. instant coffee and ground vanilla coffee
  3. Epson salt
  4. oatmeal
  5. nutmeg
  6. a few cloves tops
  7. elmers glue
  8. bit of water 
  9. Line a shallow pan with foil or wax paper.


Some of my items to grunge I usually paint brown or black first. Depending on the item. For this project the glue mixed with paint works just as good plus serves two purposes.

Prepare your grunge mix by mixing together the first six ingredients in a bowl or whatever you would like. Set aside.
Then add just a bit of water to the Elmer's glue just to make a little thinner but not too runny. Then paint this on the glass jar.
For the candle I added brown paint to the glue and a bit of water. Adding the brown paint covers the color of base item, I like it that way much better. Brown paint is not need if you like some of the base color to show through.
Then spoon the grunge mix onto the item.
After dry i sprayed with sealant. you can also sprinkle little extra cinnamon or a bit more grunge mix. If you find some spots you would like extra on.
I recommend that If you do add any extra oatmeal grunge mix to spray again. With just more cinnamon you wouldn't need to spray again.
Some of the mixture still seems to want to fall off. So I'm gonna try my good old mod podge next time to seal. Then use spray again. I just like to have more protection.


.

 Experiment and have fun crafting

********Not by any means am I an expert or even claim to be close to one. I do all my crafts by trial and error and taking other peoples advice.
I do not burn candles so take caution if you burn them. I have no clue how the candles would burn with the mixture on them.

******After posting this I have learned you can not burn these types of candles.

Sunday, May 5, 2013

My Mod Podge Projects

Mod Podge is now one of my loves in crafting. There is so much, many crafts that you can do with this wonderful adhesive stuff. Sure glad I came across the brown paper bag floor craft. It opened a whole new world of crafting to me.
One of the best sites I came across is Mod Podge Rocks.I'm sure there are many more decoupaging sites out there that I will stumble upon in my crafting adventures.
So far here is what I've made with mod podge.


My best project so far!


Mod Podge comes in a variety of formulas:
Fabric, gloss, hard coat, matte, outdoor, satin, sparkle and dimensional magic. Pick your project, pick your formula. Get crafting!

Monday, February 4, 2013

DYI Country/Rustic Wooden Spoons

Country/rustic is my decorating style. I can't really afford to pay the price of the things I would like to have decorating my home. Or my kids home which they all love that style as well.  So I'm always looking on the net or Pinterest looking for ideas to decorate our homes.  Recently I seen a site for wooden spoons and had to try the technique they said about.  I went to my uncles used store and he had some wooden spoons there for $.25 each and I picked up a few to do country/rustic style.

Got the wooden spoons home and anxious to start a new project and I pulled my paints out in four different colors trying to stick to the country/rustic colors. Reddish, indigo blue, black and not sure of the color name but in the greens. Then I started painting away.  After both sides were completely dry I took a rough piece of sandpaper and scuffed the edges a bit.  Trying to think of how they would naturally get worn.  Now my problem is I don't know what I want to put around them.  Or what to do with them. Tried tying a bit a fabric around them, also tried twine.  Seen somewhere that they were also just place in a mason jar or hung on wall.  Guess I'll figure it out.


wooden spoons, primitive decor, primitive spoons, material, painted spoons


One of the simply and least expensive crafts I've done. Another way to make my life a little Easier

Thursday, January 17, 2013

Tip for Another Mason Jar Use

I had another brilliant idea today for Another Mason Jar Use.
Above:See all the junk on the rim and lid.
I had a half quart of paint and was having problems with getting the lid on cause of all the junk on the lid rim.


So I poured it in a mason jar.  Now I can see how much and also much easier to clean the rim off to seal back up.  I also labeled the lid so everyone would know what is in the mason jar.

Chalkboard Spray Paint

Chalkboard Spray Paint by Krylon my new way to recycle some of the things I have around here that I was not really using anymore.  And of course finding new things to use the chalkboard paint on to give it an extra use.
I got one of the ideas from Simplicity in the south. She made a chalkboard gift for a teacher using a clipboard.  I like the saying she put on the chalkboard and the technique she used for adding the words.  She used Krylon flat paint with primer for her project whereas I used the Krylon Chalkboard Spray Paint.  She has many other DIY Projects on her site that I'm sure you will love.
I grab myself an old cookie sheet type pan.  Sprayed it with 3 coats of the chalkboard paint let each coat dry completely.  Then I printed out my Things to Remember saying to the size I wanted, taking a piece of chalk on its side and rubbing the back of my paper so I could use it to transfer my letters to the dried chalkboard that was just created.  Next took a pencil or pen and went over the letters transferring them to my chalkboard.  Now grab a paint pen in white and fill in those words.  Me being left handed I started from the right working backwards to paint my letters so my hand would rub in the wet letters. Let dry

Saturday, November 17, 2012

Easy Kids Christmas Ornament Wreath Craft

Last night my step son wanted to make a Christmas Ornament with glitter.  So I started thinking about different ornament crafts I've seen and remember one about using buttons. 
I got out some buttons, thin wire, the Mod Podge (of course I had to use this, one of my favorite craft supplies), the glitter (red and green), some cording or use whatever you want to use to hang your ornament.
String the buttons on the wire, make into shape of wreath, tie off by twisting the wire where the two ends meet. He then put Mod Podge all over the buttons. Oh yeah we used two bigger buttons at the top for glitter a different color. See the photo for difference.  He only applied the Mod Podge to the smaller buttons first.  Then out came green glitter and he started shaking away all over those buttons. Let dry. Reapply where needed. then he applied the glue to the larger buttons and got out the red glitter. 
After it was all dry husband then sprayed it with a sealer to help hold the glitter on just in case. Then we added the cording some leave things we had but you could put whatever you wanted on to decorate it.
There you have it an Easy Kids Christmas Ornament Wreath Craft.

Monday, September 24, 2012

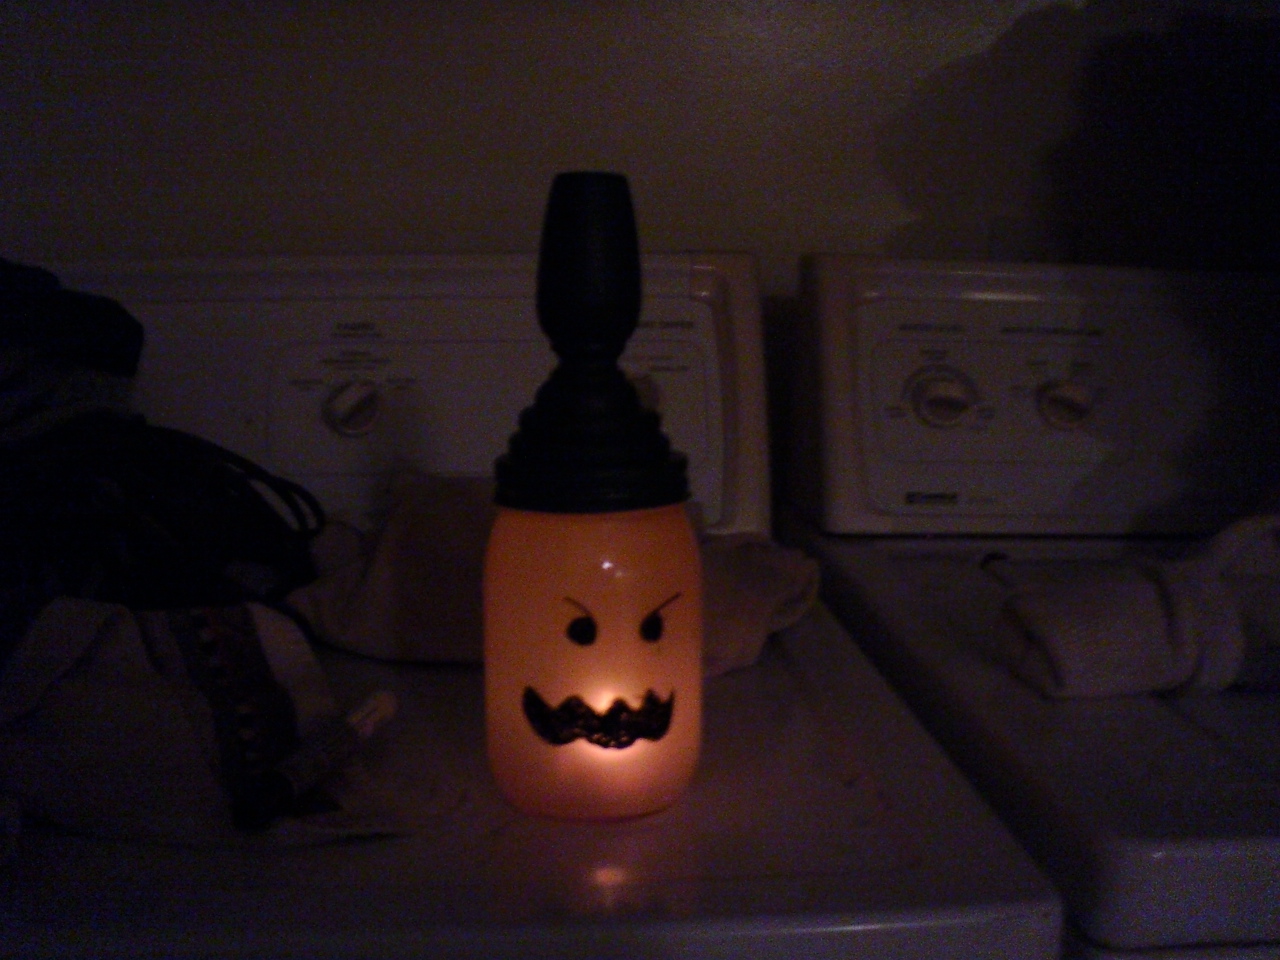
Lighted Canning Jar Pumpkin

Being a little crafty this weekend with my granddaughter. I made a lighted canning jar pumpkin.  This project really took no time at all. Gathering  a canning jar and lid and a candle holder base,  and some paint I was of crafting.

I grabbed some pumpkin orange paint  added little water to it in a little bowl.  Dumped it into the canning jar, swirled it around covering all of the inside. Dumping remaining out and tipping my jar upside down to finish draining on some wax paper and let it dry. After drying added this cute lil face with permanent black marker. Painted lid and candle holder. Hot glued them together. added a battery operated tea light. Screw lid to jar and walla my lighted Canning Jar Pumpkin

Thursday, April 12, 2012

How to recycle those soup cans into a craft

 Here I found a great way to recycle your soup cans, coffee cans or any tin can that you might use into a craft. Cynthia Shaffer has a tutorial on making a tin can caddy.  Cynthia made this caddy for her craft supplies. What a great idea to recycle those soup cans.
 tin can caddy
Be sure to check out her site at http://cynthiashaffer.typepad.com/blog/2011/01/tin-can-caddy-tutorial.html

Featured Post

Picture on Pallet with Tutorial

After seeing all these picture on pallet ideas going around I decided to make my first one. Love how it turned out. For those o...